Bài toán đặt ra
Trong rất nhiều ứng dụng chúng ta sẽ phải sử dụng dịch vụ của bên thứ 3. Ở đây tôi ví dụ dịch vụ gửi OTP qua SMS chẳng hạn. Để đảm bảo hệ thống chạy ngon lành và không phụ thuộc vào sự cố của nhà cung cấp, chúng ta nên sử dụng ít nhất 02 nhà cung cấp dịch vụ. Trong bài viết này, tôi giả định có 3 nhà cung cấp OTP qua SMS là Abenla, Esms và Nexmo. Làm thế nào để quản lý các nhà cung cấp dịch vụ này trong Laravel?
Giải pháp
Trong Laravel vấn đề trên có thể được giải quyết thông qua Builder (Manager) Pattern. Các bạn tham khảo thêm từ bài viết Builder (Manager) Pattern.
Triển khai
Bước 1: Tạo thư mục quản lý các dịch vụ
Tạo một class OtpManager theo đường dẫn app/Managers/OtpManager.php để quản lý OTP. Nội dung file OtpManager.php
<?php

namespace App\Managers;

use App\Services\Otp\AbenlaOtpService;
use App\Services\Otp\EsmsOtpService;
use App\Services\Otp\NexmoOtpService;
use Illuminate\Support\Manager;

class OtpManager extends Manager
{

    /**
     * @inheritDoc
     */
    public function getDefaultDriver()
    {
        // TODO: Implement getDefaultDriver() method.
        return 'abenla';
    }

    /**
     * Driver Abenla
     *
     * @return AbenlaOtpService
     */
    public function createAbenlaDriver()
    {
        return new AbenlaOtpService();
    }

    /**
     * Driver esms
     *
     * @return EsmsOtpService
     */
    public function createEsmsDriver()
    {
        return new EsmsOtpService();
    }

    /**
     * Driver nexmo
     *
     * @return NexmoOtpService
     */
    public function createNexmoDriver()
    {
        return new NexmoOtpService();
    }
}
Trong đó, hàm getDefaultDriver() sẽ trả về nhà cung cấp mặc định khi ta không truyền vào. Các hàm createAbenlaDriver(), createEsmsDriver() và createNexmoDriver() sẽ được tự động kích hoạt khi ta gọi nhà cung cấp tương ứng. Như vậy, trong mỗi hàm trên sẽ xử lý nghiệp vụ tương ứng với từng nhà cung cấp. Khi có nhà cung cấp mới, các bạn bổ sung thêm hàm vào để giao nhiệm vụ cho class tương ứng xử lý. Cụ thể:
- Khi bạn muốn gửi OTP bởi nhà cung cấp Abenla thì class AbenlaOtpService sẽ đảm nhiệm
- Khi bạn muốn gửi OTP bởi nhà cung cấp Esms thì class EsmsOtpService sẽ đảm nhiệm
- Khi bạn muốn gửi OTP bởi nhà cung cấp Nexmo thì class NexmoOtpService sẽ đảm nhiệm
Thêm nhà cung cấp mới theo mẫu hàm create[Mã nhà cung cấp]Driver().
Bước 2: Tạo class xử lý nghiệp vụ theo từng nhà cung cấp
Các bạn có thể tổ chức thư mục để quản lý như ảnh minh họa
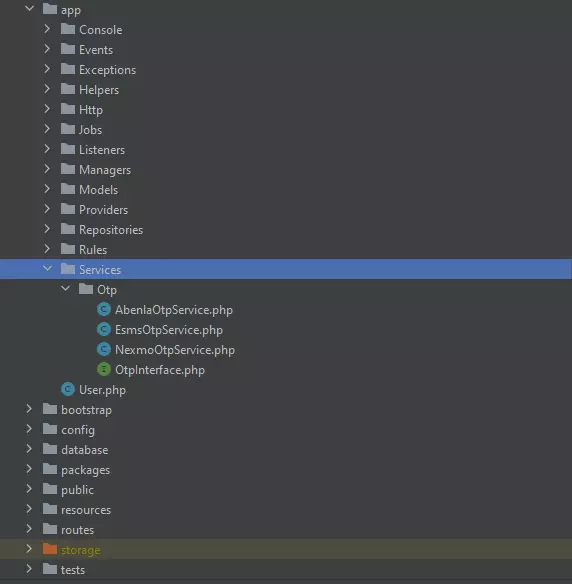
Trong đó, tôi có tạo 1 interface để quản lý các hàm nghiệp vụ chung. Nội dung file app/Services/Otp/OtpInterface.php tham khảo
<?php

namespace App\Services\Otp;

interface OtpInterface
{
    public function sendOtpByVoice($mobile, $otp, $options);
    public function sendOtpBySms($mobile, $otp, $options);
}
Class xử lý khi kết nối với nhà cung cấp Abenla, xem file app/Services/Otp/AbenlaOtpService.php
<?php

namespace App\Services\Otp;

class AbenlaOtpService implements OtpInterface
{

    public function sendOtpByVoice($mobile, $otp, $options)
    {
        // TODO: Implement sendOtpByVoice() method.
        return 'AbenlaOtpService:sendOtpByVoice:' . $mobile;
    }

    public function sendOtpBySms($mobile, $otp, $options)
    {
        // TODO: Implement sendOtpBySms() method.
        return 'AbenlaOtpService:sendOtpBySms:' . $mobile;
    }
}
Class xử lý khi kết nối với nhà cung cấp Esms app/Services/Otp/EsmsOtpService.php
<?php

namespace App\Services\Otp;

class EsmsOtpService implements OtpInterface
{

    public function sendOtpByVoice($mobile, $otp, $options)
    {
        // TODO: Implement sendOtpByVoice() method.
        return 'EsmsOtpService:sendOtpByVoice:'.$mobile;
    }

    public function sendOtpBySms($mobile, $otp, $options)
    {
        // TODO: Implement sendOtpBySms() method.
        return 'EsmsOtpService:sendOtpBySms:'.$mobile;
    }
}
Class xử lý khi kết nối với nhà cung cấp Nexmo app/Services/Otp/NexmoOtpService.php
<?php

namespace App\Services\Otp;

class NexmoOtpService implements OtpInterface
{

    public function sendOtpByVoice($mobile, $otp, $options)
    {
        // TODO: Implement sendOtpByVoice() method.
        return 'NexmoOtpService:sendOtpByVoice:'.$mobile;
    }

    public function sendOtpBySms($mobile, $otp, $options)
    {
        // TODO: Implement sendOtpBySms() method.
        return 'NexmoOtpService:sendOtpBySms:'.$mobile;
    }
}
Bước 3: Sử dụng
Bạn có thể tạo một artisan command để test theo đường dẫn app/Console/Commands/Dev/TestCommand.php. Trong hàm handle, ta viết như sau:
public function handle(OtpManager $otpManager)
    {
        // Manager
        //$result = $otpManager->driver('abenla')->sendOtpBySms('0912345678', '113115', []);
        //$result = $otpManager->driver('esms')->sendOtpBySms('0912345678', '113115', []);
        $result = $otpManager->driver('nexmo')->sendOtpBySms('0912345678', '113115', []);

        print_r($result);

    }
Khi dùng dịch vụ của nhà cung cấp nào Bạn chỉ cần truyền qua driver('nexmo') là xong.
Lưu ý: khi Bạn gọi driver('nexmo') thì Laravel sẽ tự động gọi đến hàm createNexmoDriver() trong file app/Managers/OtpManager.php để xử lý. Hàm này sẽ giao cho class NexmoOtpService() để xử lý nghiệp vụ cụ thể.
Hy vọng bài viết sẽ góp ích cho các Bạn!
Nguồn: Viblo